A week ago I decided to give my bedroom this thing my mom called a "general cleaning". This means that I'd have to explore every nook and cranny making sure that every single atom of dust has been dispatched. So if you're wondering where I got my crazy spick-and-span attitude, I'd give you a straight out answer: Mom. In simpler terms, we're neat freaks! Haha.
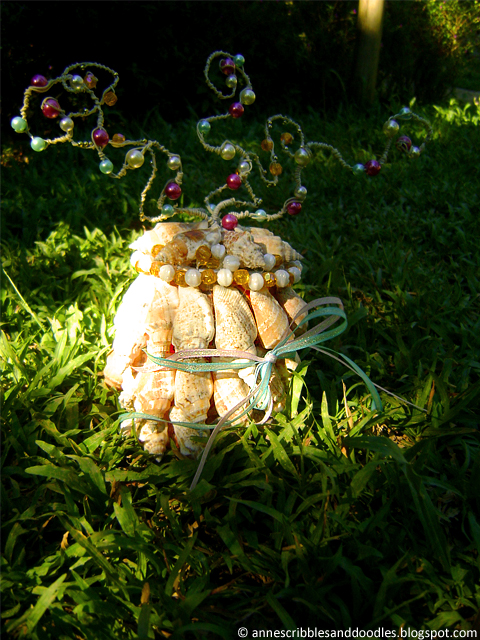
Basically, my bedroom is filled with all sorts of projects I made over the years. Whenever I feel bored with my room's look, I try to revamp it with a new craft I fashioned from the random things I found at home. One of my favorite pieces is this shell-designed accessory organizer. I made it way back high school. Fast forward four years and it's still alive! So I'd really love to share with you how I made it...
My mom often prepared this yummy spicy dish which comprised of shells and coconut milk. My grandma would refer to these shells as kinason. Aninikad or more commonly known as kinason in Cebu is a common edible shellfish specie found in the Philippines. When eating it you'd have to make use of a safety pin or a pardible (as what we often call it) in order to get the mollusk out of its shell. (By the way, I've spent an hour looking for the name of these shells! I simply didn't know how to explain it to Google. Haha. Anyway, if you know of any other name for it please let me know.) Once you finish eating, the shells go straight to the trash bin. I remember telling my mom what a waste it was. The shells were so pretty. I could definitely use them somewhere. One day, she surprised me as she handed me a bowl filled with clean aninikad shells! I wasted no time and made this little project:

I was taking pictures in our garden under the shade of our Rambutan tree. Mister Sun was kind enough to peek through the leaves and provide me with a natural spotlight.
CLEANING (SHELLS):
Get a basin, fill it with water and laundry soap. Soak the shells for about 30 minutes then rinse. After which, put water and bleach in another basin and soak the shells for at least an hour. Make sure that everything is completely submerged. If you want to retain the natural detail of the shells use a color safe bleach but if you want it to become whiter you may use the regular one. Here's the weird part, my mom would suggest that you leave the shells in your garden for a day or two so the ants can eat up whatever is left inside. I know it's kinda odd but she says this is needed so that the odor will die away and no insects will crawl inside the shells. After this, all you have to do is wash it again with soap and water. Let it dry and you're done. (If you have ideas on how to clean these shells better and faster please let me know.)

STEP 1: Get 3 pieces of floral wire and tie one end together. This will serve as the spine. Get another piece and twirl it around the spine. As you do so add in beads of your choice. Seal the top by folding out the wires. Make five of these. You may vary the designs as you wish.

STEP 2: Join them together using floral wires making sure that you tie them an inch from the bottom. Spread the bottom part out and attach it to the lid. (They will look like tree roots clinging on the can's lid.) Use a glue gun to do this and to add support, wrap a few wires around it. Get your can and fill it with stones. Don't forget to clean these too.They will add in weight to keep your organizer from toppling over. To avoid the stones from moving around inside, you can insert crumpled paper. Get your glue gun and glue the lid to the can.

STEP 3: Glue the shells all around and above the can. For empty spaces in between them make use of beads. Play with your materials and decorate to your liking. Your creativity will play a big part.

STEP 4: Tie a ribbon around the body to add a cute accent to your accessory organizer.

STEP 5: Hang your accessories and we're done!

What I love about it is that the floral wire is sturdy enough to hold your accessories but soft enough that you can twist them. I can change how it appears by simply modifying the way they twirl or loop around. Plus, depending on what accessories you put and how you place them, you can also play or alter the look.

If you want to share your ideas on how to improve this DIY, do comment down below. The materials I used here were the random stuff I found at home and the leftovers from my school projects then. If you do decide to try it out, you can tweet me a photo or tag me on Instagram. Don't forget to use #CRAFTSWITHANNE so I can find them. I'd love to see what you come up with.
Thanks for reading!


26 comments:
This is so cute and very creative!! xo akiko
Style Imported
thanks Akiko!
This is such a beautiful and unique organizer! I love the beaded wire.
I've been spring cleaning a lot too! Gotta get into all those nooks and crannies. ;)
Thanks Erica! I'm glad you liked them. :)
There are many ways to go about organizing your accessory. Different methods make more sense depending on your space and what you’re storing. No matter which method you choose, these accessory organizer definitely helps you to reduce the space usage. Once again great post man! Cheers!
This looks so great!! Your are very artisty Anne!! Nice decor piece. :)
nikitapalei.blogspot.in
Thanks Nikita! Right now I've actually transformed this piece to hold photos instead of accessories. ;)
That's so lovely! We often throw those types of shells and I thought of recycling them but never thought of any way to creatively make use of them. Hehe. Thanks for sharing!
It's so beautiful Anne. I love this DIY :D
Xx, Vanessa | The College Candy
Nice Anne! Grabe ang details. Ikaw nag design sa beads into the wire?
You really have a way with your hands Anne! This is really a nice piece.
HAHAHAHA! nagkatawa gyudko sa "I didn't know how to explain it to Google"! Bisag ako sad siguro Anne! Haha. Magaway siguro ming Google! Pero kalami gyud sa kinason/aninikad ay! Haha. Sa amo, ang kinason are the smaller ones. And the one sa imong DIY project, is what we call aninikad. Hehe.
Anyway, nice ni nga project ay! Pasar gyud ka sa mga DIY stuff Anne! :)
Anne you're so creative! This is really beautiful!
I'm always amazed at your creativity, ate Anne. Great job on recreating something that looks a ton better than the ones I find in stores! Haha. You could probably make a business out of this, if it interests you, of course. Hahaha :)
Mimi | The Foxy Heroine
I think I like to start collect and keep aninikad shells after reading this post. Great that you have reused and upcycled them, very creative!
i love it! This is really great. :)
Thank you Rea! :)
Awww thanks Vanessa!
Thanks Tara! Yes ako. :)
Thanks Hannafrej!
Haha. I'm glad napatawa tika Jan! Lami dyud especially with coconut milk/gata! Wa ko kabalo naa diay difference ang aninikad/kinason. Abi kog same ra. Ako nang timanan. :)
Awww thanks pretty Kath!
You've just given me a great idea Mimi! Well I might just do that. Thanks! :)
Thanks Fernan. Go ahead and collect!
I so love it <3
Genevlsc.blogspot.com
Thank you Hanna!
Post a Comment